Easily Resize Your Photos With This Simple iOS Shortcut
Social media isn't the only digital platform that runs on photos and videos. Your website—and your blog need great photography and captivating video to engage your readers. Often, though, we spend a lot of time worrying about where to find and how to use those media assets, and not enough time thinking about what they do to our websites.
For example, adding high-quality photos to your blog post can make the text feel less daunting, engaging content, and increasing your readership and retention. However, it also makes your pages load more slowly—especially for people on slow Internet connections—can require more system resources from your readers' computers and mobile devices, and can be inaccessible to some with visual impairments.
One easy way to address most of these issues is to reduce your photos' file sizes before uploading them to your website and embed them into your post. There's no shortage of apps out there that can help you do this—from those that came pre-installed on your computer, to free and paid apps like Squoosh and Adobe Suite. But when you're dealing with a group of photos, manually resizing all of them can quickly eat up your time. What starts as just a few minutes a day can soon become hours per week. Why not reclaim some of your time?
If you have an iOS device, Apple kindly included a super handy utility called Siri Shortcuts, created after acquiring an app called Workflow. Workflow—now Shortcuts—lets you create custom workflows to automate things like downloading images from a website, creating playlists from your music library, finding your commute time, among many, many others. The combinations that you can create are nearly limitless.
One particularly useful combination that I've found is one that batch resizes your photos automatically. Whenever I have a folder full of images that need to be scaled down before they're uploaded to WordPress or another CMS, I start this Shortcut, and in just a few seconds, the entire group is resized and ready to upload. If you're using an iOS device that runs Shortcuts, here's how to create your own:
Open Shortcuts on your iPhone or iPad and select the + symbol in the app's top right corner.
When the New Shortcut screen opens, click on the three dots menu to type in a shortcut name—something like "Photo Resizer" or whatever you like. You can also tap on the icon next to the name to choose a new symbol or change the color if you want.
Next, you'll want to toggle the Show in Share Sheet switch on to see your new shortcut in your Share button. (You can turn off or leave on the Show in Widget switch. This won't impact your usage of the shortcut). Click Done.
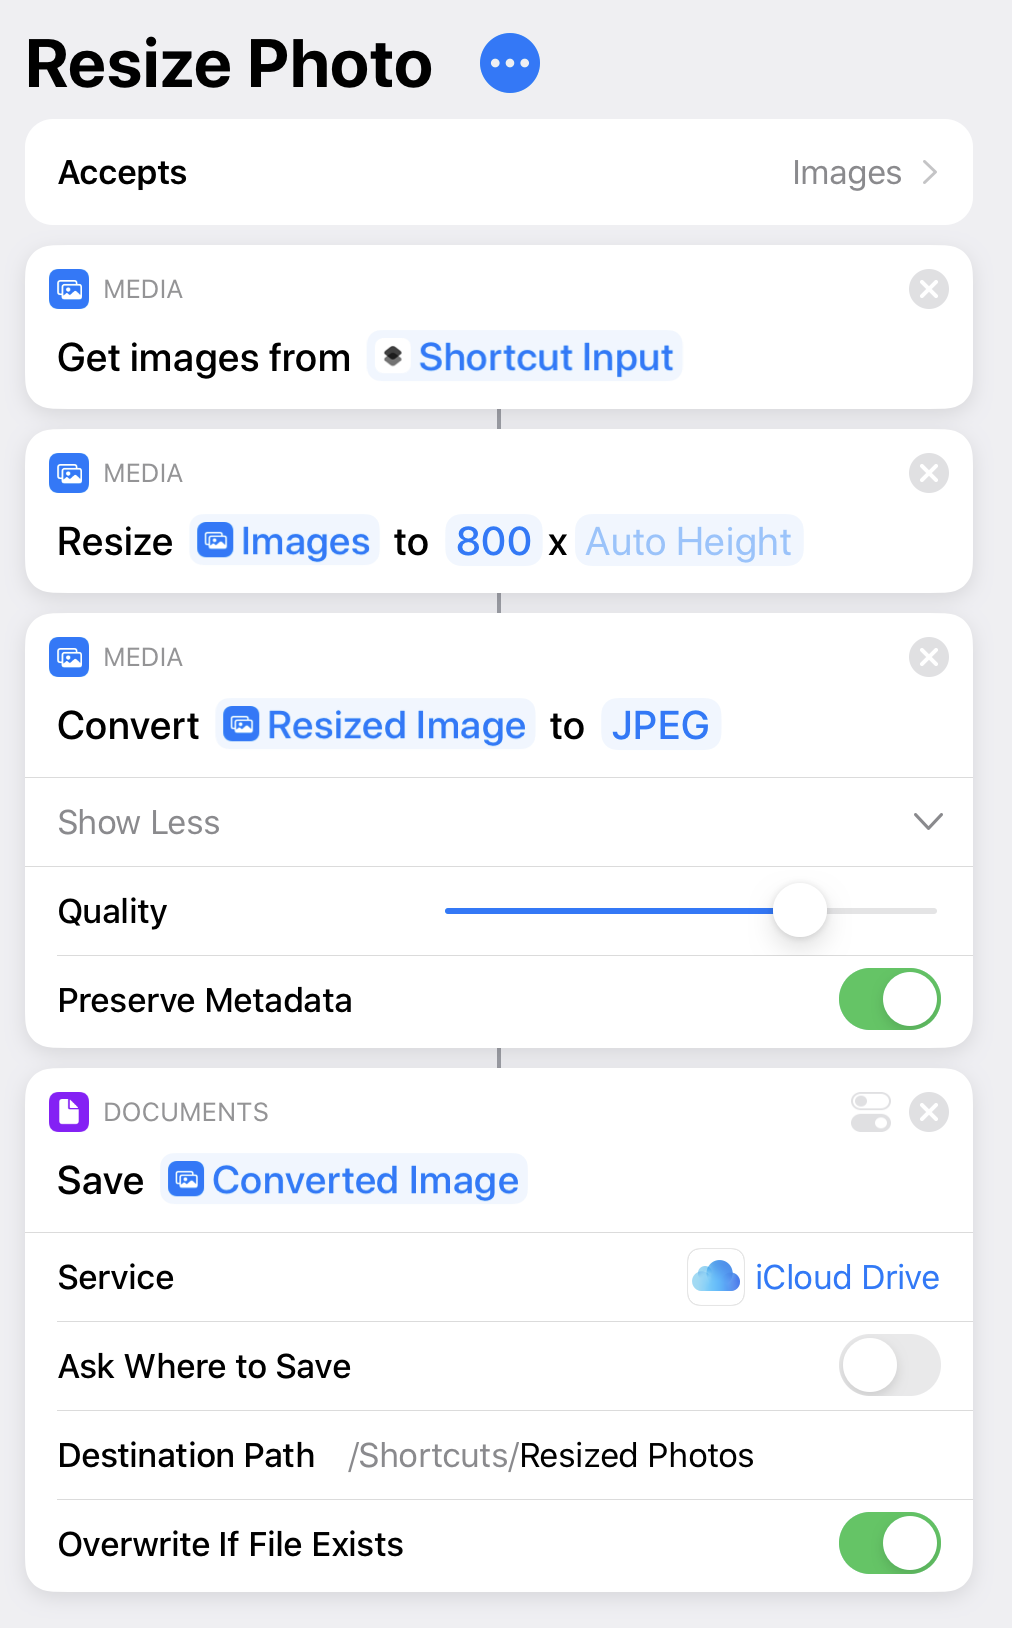
Now that you're back on the shortcut page select Media in the left menu. And scroll down until you find Get images from Input and select it.
In the same Media menu from the left-hand side of your screen, select Resize Image, as well, so that it falls underneath Get Images from Input. You can choose to update the resizing dimensions to whatever you'd prefer. I typically go with 800 as my width and then leave the height as Auto to preserve the new width ratio. You can also have the shortcut ask you each time, too.
Next, with the Media options still open in your left-hand menu, select Convert Image from the list. A jpeg file type should work for you, but you can also select something else like Match Input if you prefer.
Now go Back from the Media menu and select Documents. In this menu, find Save File and select it. This allows you to export your newly resized and converted photo into either iCloud Drive or Dropbox (if you want to save to Google Drive, you can always move the file using the Files app on your iPhone or iPad). If you leave Ask Where to Save checked, it will prompt you to choose a location instead of defaulting a static 'Shortcuts' folder in iCloud Drive.
Now click Done at the top, and you'll see your completed shortcut in your Shortcuts app.
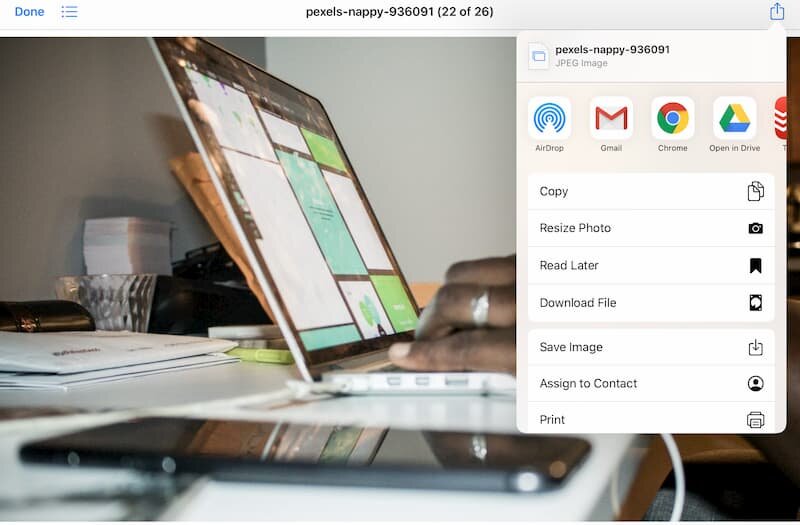
You can choose the image(s) you want to resize and press the Share Sheet button (see below).
If you don't see your shortcut listed in the Share Sheet, scroll all way down to where it says Edit Actions... When this menu pops up, you should see your shortcut listed under Other Actions. If you don't, then jump back over to the Shortcuts app, press the 3-dots menu to edit the shortcut, then press the 3-dots menu again to open up the 'Details' card. This is where we named our shortcut, and you can select Show in Share Sheet. This must be turned on for your shortcut to show up in that menu.
And that's it. You can now resize photos straight from your iPhone or iPad. And if you select multiple files at once, you can batch resize them so that you don't have to do it one-at-a-time via an app like Squoosh.